10 Steps to Cook a Turkey in a Bag
Cooking a turkey can feel overwhelming, especially when you want it to turn out juicy and flavorful without spending hours watching over it. You’re not alone—many people struggle with dry or unevenly cooked turkey. If you’ve been searching for an easier method, cooking a turkey in a bag might just be the game-changer you need.
To cook a turkey in a bag, gather your ingredients like a thawed turkey, seasonings, and a cooking bag. Prepare your turkey by thawing it properly and seasoning it generously.
Place the turkey in the bag, seal it, and cut ventilation holes. Bake it for 2 to 2.5 hours, monitoring the internal temperature until it reaches 165°F. Let it rest for juicy slices.
Follow these steps for a moist turkey, and you’ll uncover even more helpful tips along the way.
Key Takeaways
- Choose a thawed turkey (10-14 pounds) and season it with salt, pepper, and your favorite herbs to boost the flavor.
- Place the seasoned turkey in a BPA-free cooking bag. Make sure it fits comfortably and cut ventilation openings at the top.
- Preheat the oven and cook the turkey for about 2 to 2.5 hours. Keep an eye on the internal temperature until it hits 165°F.
- Let the turkey rest after cooking. This helps keep it moist and makes the flavor even better before you carve it.
- Serve with classic sides, and think about using any leftovers in sandwiches or soups for extra meals.
Gather Your Ingredients and Supplies
To cook a turkey in a bag, you’ll need a few key ingredients and supplies. Start with a thawed turkey, ideally around 10 to 14 pounds. You’ll also want a roasting bag, which helps keep the turkey moist.
For flavor, gather seasonings like salt, pepper, garlic powder, and any herbs you prefer. Don’t forget to pick up a meat thermometer to guarantee your turkey reaches a safe internal temperature of 165°F.
When it comes to ingredient substitutions, feel free to swap out seasonings or use a different type of fat, like olive oil instead of butter. Keep in mind turkey safety tips: always wash your hands after handling raw turkey and avoid cross-contamination with other foods.
With your ingredients and supplies ready, you’re all set to enjoy a delicious turkey dinner!
Prepare Your Turkey for Cooking
To get started with preparing your turkey, first pick the right one for your feast. You’ll want to know about the different thawing methods to make sure it’s ready when it’s time to cook. So, let’s take a closer look at how to make the best choices for a delicious turkey in a bag.
Choose The Right Turkey
Choosing the right turkey is essential for a successful meal, and there are a few key factors to take into account. First, consider turkey types. You can choose between fresh, frozen, or organic turkeys, each offering unique flavors and textures. Fresh turkeys are generally more flavorful, while frozen ones are often more convenient.
Next, think about your cooking methods. If you’re using a bag, a whole turkey works best, as it retains moisture and cooks evenly. Pay attention to the size, too; a good rule of thumb is 1 to 1.5 pounds per person.
With these factors in mind, you’ll set yourself up for a delicious turkey dinner that everyone will enjoy.
Thawing Methods Explained
How can you guarantee your turkey is perfectly thawed before cooking? You’ve got a couple of safe methods to choose from. The best way is to plan ahead and use the refrigerator method.
Simply place your turkey on a tray, keeping it in the fridge for about 24 hours for every 4-5 pounds. If you’re short on time, the cold water method works too. Submerge your turkey in its original packaging in cold water, changing the water every 30 minutes.
This method takes about 30 minutes per pound. Avoid thawing at room temperature, as it can lead to bacterial growth. By using these thawing techniques, you’ll make certain your turkey’s ready for that delicious cooking in a bag!
How to Season Your Turkey for Cooking in a Bag
Seasoning your turkey for cooking in a bag can improve its flavor and create a deliciously moist result. Start by choosing your preferred herb blends to complement the turkey’s natural taste. Consider different flavor profiles to suit your meal.
Here’s a quick reference table to help you choose:
| Herb Blend | Flavor Profile | Suggested Use |
|---|---|---|
| Italian Seasoning | Savory and aromatic | Great for Mediterranean dishes |
| Poultry Seasoning | Earthy and warm | Classic choice for traditional flavors |
| Cajun Seasoning | Spicy and zesty | Adds a kick to your turkey |
| Lemon-Pepper Blend | Bright and tangy | Perfect for a fresh twist |
Rub your chosen seasoning under the skin and inside the cavity for maximum flavor. Don’t forget to add a bit of salt and pepper to improve the taste even further!
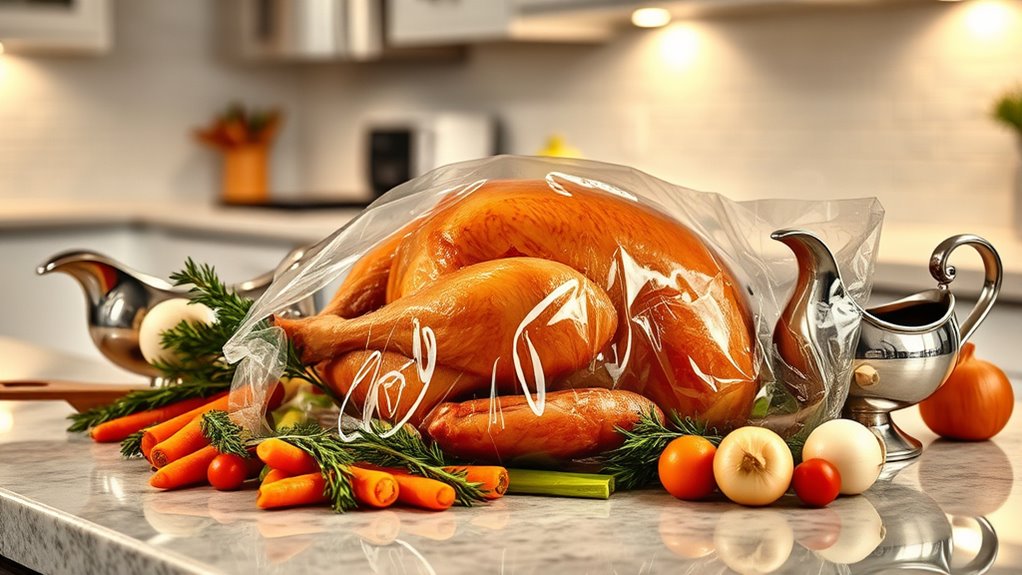
Place Your Turkey in the Cooking Bag
To get started, grab your cooking bag and carefully place your seasoned turkey inside. Make sure the turkey is positioned breast-side up for ideal cooking. This placement allows the heat to circulate evenly, ensuring a juicy and tender result.
As you lower the turkey into the bag, be cautious to avoid tearing the material; a secure bag is essential for effective cooking techniques. Ensure the turkey fits comfortably within the bag without overcrowding.
If you’re adding vegetables or other ingredients, do so sparingly to prevent any interference with the cooking process. Once the turkey is inside, you’ll notice how the bag helps retain moisture, enhancing flavor and tenderness.
This method not only simplifies cleanup but also promotes an even cook. Now that your turkey is snugly in the bag, you’re one step closer to a delicious, hassle-free feast!
Seal and Cut the Cooking Bag Properly
To get the best results when cooking your turkey in a bag, you want to make sure you seal it properly. It’s important to pick the right bag and seal it tightly so all those juices and flavors stay locked in. Also, don’t forget to cut some ventilation openings—this helps the turkey cook evenly throughout.
Choose The Right Bag
Choosing the right cooking bag is vital for guaranteeing your turkey turns out juicy and flavorful. The materials of the bag can impact both the taste and cooking safety, so it’s important to select wisely.
Here are four tips to help you choose:
- Opt for Heat-Resistant Bags: Confirm the bag can withstand high temperatures without melting or breaking down.
- Check for BPA-Free Labels: This assures no harmful chemicals leach into your turkey.
- Choose a Size That Fits: Make sure the bag can comfortably hold your turkey without being too tight.
- Look for Reinforced Seams: Strong seams reduce the risk of spills and keep your turkey safe while cooking.
With the right bag, you’re on your way to a delicious meal!
Seal It Tightly
Sealing the cooking bag tightly is essential for locking in moisture and flavor as your turkey cooks. Start by choosing high-quality bag materials designed for oven use.
Once you’ve placed your turkey inside, use effective sealing techniques, such as twisting the bag’s neck and securing it with a sturdy tie or clip. Make certain the seal is snug to prevent any steam from escaping.
If you’re using a disposable bag, verify it’s properly fitted around the turkey to avoid leaks. Remember, a tight seal not only keeps flavors intact but also helps the turkey cook evenly.
Take your time to get it right. Your delicious, juicy turkey depends on it!
Cut Ventilation Openings
While sealing the cooking bag is essential, cutting ventilation openings is just as important for a successful turkey. Proper ventilation techniques guarantee that steam escapes, preventing the bag from bursting and keeping your turkey moist. Here’s how to do it safely:
- Choose the Right Spot: Cut small slits, about 1-2 inches long, at the top of the bag.
- Avoid Overdoing It: Don’t make too many cuts; 3-4 should suffice for proper airflow.
- Check for Safety: Make sure your cuts are away from the turkey to maintain bag safety.
- Monitor Cooking: Keep an eye on the turkey while it cooks, adjusting if necessary to maintain ideal steam release.
With these steps, you’ll achieve a perfectly cooked turkey!
Optimal Cooking Temperature for a Juicy Turkey
To achieve a juicy turkey, aim for an ideal cooking temperature of 165°F (74°C) in the thickest part of the breast. This temperature guarantees that harmful bacteria are eliminated while keeping the meat tender and flavorful.
As you cook the turkey in a bag, the moisture retention will help prevent dryness, allowing for a delicious, succulent result. Don’t forget to use basting techniques to improve flavor.
While the bag holds in moisture, you can still add some broth or flavorful seasonings before sealing it up. This not only infuses your turkey with delicious flavors but also contributes to that perfect golden-brown skin.
Turkey Cooking Time: What to Expect
When you’re cooking your turkey in a bag, knowing the right cooking time is super important if you want a perfectly juicy meal. You’ll want to base this timing on the turkey’s weight, and don’t forget to factor in a resting period after it comes out of the oven. So, let’s break down these essential guidelines to make sure your turkey turns out great.
Cooking Time Guidelines
Cooking a turkey in a bag can markedly reduce your cooking time, making it a convenient option for holiday gatherings. This cooking technique not only speeds things up but also locks in moisture, enhancing flavors beautifully. Here are some guidelines to help you plan:
- Preheat your oven to the recommended temperature for best results.
- Cook turkey for 2 to 2.5 hours for a 12 to 14-pound bird; adjust as necessary.
- Check the internal temperature; it should reach 165°F in the thickest part.
- Let it rest for at least 20 minutes before carving, allowing the juices to redistribute.
Weight-Based Timing
Understanding weight-based timing is essential for a perfectly cooked turkey. The cooking time largely depends on the turkey’s weight. Generally, you’ll need about 13-15 minutes per pound if you’re using a bag.
For example, a 12-pound turkey typically takes around 2.5 to 3 hours. However, weight variations can affect this estimate, so always check the internal temperature.
If your turkey is on the heavier side, you might need to make some cooking adjustments, such as increasing the time or lowering the oven temperature slightly. Using a meat thermometer guarantees the turkey reaches a safe 165°F in the thickest part.
This way, you’ll serve a juicy, well-cooked turkey that everyone will enjoy!
Resting Period Importance
After ensuring your turkey is cooked to perfection, the next step is often overlooked: the resting period. This essential time allows the juices to redistribute, enhancing flavor and tenderness.
Here are some key resting benefits you shouldn’t miss:
- Moisture Retention: Resting helps keep your turkey juicy, preventing dry meat.
- Easier Carving: Letting it rest allows the fibers to relax, making slicing smoother.
- Enhanced Flavor: The resting period lets the seasonings penetrate deeper, boosting taste.
- Temperature Stabilization: It helps maintain an even temperature throughout the bird, ensuring every bite is just right.
Monitor Internal Temperature for Perfect Results
To guarantee your turkey is perfectly cooked, monitoring its internal temperature is essential. Use a reliable meat thermometer to confirm cooking accuracy. Insert the thermometer into the thickest part of the turkey, avoiding bone, which can give you an inaccurate reading. For safety, the internal temperature should reach at least 165°F (74°C).
Start checking the temperature about 30 minutes before the recommended cooking time ends. This way, you won’t risk overcooking. If you notice the turkey is close to the target temperature, keep a close eye on it. Remember, cooking times can vary based on the size of the turkey and your oven’s performance.
Temperature monitoring isn’t just about safety; it also affects flavor and juiciness. Once you hit that magic number, you can be confident your turkey will be tender and delicious. So, stay vigilant, and enjoy the cooking process!
Rest Your Turkey for Moisture
Once your turkey reaches that perfect internal temperature, don’t rush to carve it right away. Letting it rest is essential for retaining moisture. This simple step offers numerous benefits that improve your turkey’s flavor and texture.
Here’s how to rest your turkey effectively:
- Remove from Oven: Take the turkey out of the bag and place it on a cutting board.
- Cover Loosely: Tent it with aluminum foil to keep the heat in while allowing steam to escape.
- Wait Patiently: Let it rest for at least 20-30 minutes. This helps with moisture retention as the juices redistribute.
- Carve When Ready: After resting, carve your turkey for a juicy, flavorful result.
Serve and Enjoy Your Perfectly Cooked Turkey
Now that your turkey has rested, it’s time to serve and enjoy the delicious results of your efforts. Start by using proper carving techniques to slice the turkey neatly, showcasing the juicy meat. For plating, consider garnish ideas like fresh herbs or citrus slices to add a pop of color.
Pair your turkey with classic side dishes such as mashed potatoes, green beans, or cranberry sauce for a well-rounded meal. When it comes to serving suggestions, think about how to arrange everything beautifully on the table.
After the feast, don’t forget about leftover recipes! You can transform extra turkey into sandwiches, soups, or casseroles. Flavor pairings like sage and thyme elevate your meal prep, ensuring every bite is flavorful.
With these tips, you’ll not only impress your guests but also savor the joy of your perfectly cooked turkey long after the feast is over. Enjoy!
Frequently Asked Questions
Can I Cook a Frozen Turkey in a Bag?
You can’t cook a frozen turkey in a bag directly. It’s essential to thaw it first for even cooking. If you try cooking it frozen, the outside might overcook while the inside remains undercooked.
Generally, a fully thawed turkey takes about 13-15 minutes per pound in the bag. So, plan ahead, thaw your turkey in the fridge, and guarantee it’s safe and delicious when you serve it.
What Type of Cooking Bag Should I Use?
You should use a heavy-duty, oven-safe cooking bag designed for poultry. Look for bags made from materials like nylon or polyester, which can withstand high temperatures.
Make certain the bag is large enough to fit your turkey comfortably; typically, a 16 to 20-pound turkey requires a 20-inch bag. Always check the packaging for size guidelines and follow the manufacturer’s instructions to guarantee safe and effective cooking.
Can I Reuse the Cooking Bag?
You can’t safely reuse a cooking bag. While turkey bag recycling sounds eco-friendly, it poses risks. Cooking bags can degrade during use, so reusing one might lead to leaks or even food contamination.
Always prioritize cooking bag safety to guarantee your meal is both delicious and safe. For best results, stick to using a fresh bag each time. It’s a small step that makes a big difference in your cooking experience!
How Do I Avoid a Soggy Turkey?
To avoid a soggy turkey, you’ll want to start with effective brining techniques; they improve flavor while retaining moisture. Have you considered using a dry brine instead? It helps create a crispy skin.
When seasoning, opt for a mix of herbs and spices that complement your turkey. Make sure to let it rest after cooking, as this allows the juices to redistribute.
A well-seasoned, properly rested turkey is your best bet!
What Sides Pair Well With Turkey Cooked in a Bag?
For a turkey cooked in a bag, you can’t go wrong with classic Thanksgiving traditions. Creamy mashed potatoes and savory stuffing are holiday favorites that complement the turkey’s flavors beautifully.
Roasted Brussels sprouts and glazed carrots add a touch of color and sweetness, enhancing your flavor pairings. Don’t forget cranberry sauce; its tartness balances the richness of the turkey.
These side dishes will surely make your feast memorable and festive!
Conclusion
You’ve navigated the delightful journey of cooking a turkey in a bag, and your culinary masterpiece awaits. With its tender, juicy allure, this turkey is sure to charm your guests and enhance your gathering.
As you slice into your golden creation, relish the satisfaction of your efforts. Remember, it’s not just a meal; it’s a celebration of flavors, warmth, and togetherness.
So, gather your loved ones and let the feasting begin. Bon appétit, and enjoy your perfectly cooked turkey in a bag!