Tips to Use a Piping Bag for Perfect Decorating
Struggling to get those perfectly piped decorations just right? You’re not alone. Many people find that mastering the art of using a piping bag can be tricky and frustrating.
Whether it’s uneven lines or inconsistent shapes, the desire for smooth, professional results is something every baker shares.
To perfect your piping skills, start by choosing the right bag; silicone or disposable works well for most projects.
Make sure your icing is the right consistency; it should hold its shape but flow smoothly.
Practice on parchment to gain confidence and maintain even pressure while piping.
Don’t worry about early mistakes; every attempt sharpens your technique.
If you’re looking to improve your decorating game, there’s plenty more to investigate to upgrade your piping prowess.
Key Takeaways
- Choose the right piping bag type based on your project, like silicone for flexibility or disposable for convenience.
- Make sure your icing is smooth but still holds its shape. This helps you control the flow better when piping.
- Practice on parchment paper first to get your shapes and letters just right before working on your final piece.
- Keep even pressure on the bag while you pipe. This helps you get consistent results and avoid any leaks.
- Clean your piping tips and bags right after you’re done. It prevents clogs and keeps everything working great.
Choosing the Right Piping Bag: A Beginner’s Guide
Choosing the right piping bag can make all the difference in your decorating experience. When you’re starting out, consider the materials first.
Silicone bags offer flexibility and ease of cleaning, while disposable plastic bags are convenient for quick projects. You’ll appreciate the sturdiness of cloth bags for heavier mixtures.
Next, think about piping bag sizes. Smaller bags are perfect for intricate designs and details, while larger bags can hold more icing for bigger projects, reducing the need for constant refilling.
A good rule of thumb is to select a size that fits your hand comfortably. This helps you maintain better control while decorating.
Don’t forget to pair your bag with the right tips, which will improve your decorating precision. With the right combination of materials and sizes, you’ll find piping becomes more enjoyable and your creations will look even better.
Happy decorating!
Essential Piping Tips for Beginners
While mastering piping techniques may seem challenging at first, a few essential tips can make the process smoother and more enjoyable. Start by focusing on piping consistency tips; your icing should be thick enough to hold its shape but thin enough to flow smoothly. A good test is to let a spoonful of icing fall back into the bowl—if it holds its shape for a moment before sinking, you’re on the right track.
Next, practice during decorating practice sessions. Use a plain sheet of parchment to create different shapes, letters, or borders. This will help you gain control and build confidence. Don’t forget to maintain even pressure on the piping bag; it’s key to achieving consistent results.
Finally, keep in mind that practice makes perfect. Don’t be discouraged by early attempts. Each session is an opportunity to improve and refine your skills!
Types of Piping Tips: A Guide to Their Uses
With regard to piping tips, knowing your options can significantly improve your decorating game. Different piping tip shapes and materials can dramatically affect your designs. Here’s a quick guide to help you choose the right ones:
| Shape | Use | Material |
|---|---|---|
| Round | Writing and outlines | Stainless steel |
| Star | Flowers and borders | Plastic |
| Leaf | Leaves and petals | Silicone |
Stainless steel tips are durable and often provide the best results. Plastic tips might be more affordable and easier to handle for beginners. Silicone tips are flexible and great for intricate designs.
How to Fill a Piping Bag Like a Pro
Filling a piping bag like a pro can improve your decorating skills dramatically. Proper piping bag preparation is key to achieving that perfect finish. Here are some effective filling techniques to get you started:
- Choose the Right Bag: Select a piping bag that suits your project, whether it’s disposable or reusable.
- Prepare the Bag: Place the piping tip in the bag and cut the end, making sure it fits snugly.
- Fill with Care: Hold the bag upright in a glass or bowl, then spoon in your icing or filling. Fill it about two-thirds full.
- Remove Air Bubbles: Gently tap the bag against the counter to get rid of air, and then twist the top to seal.
How to Master Basic Piping Techniques
Mastering basic piping techniques can improve your cake decorating game considerably. Start by familiarizing yourself with different icing consistencies. For outlines, use a thicker icing; for filling, a softer consistency works best. Practice simple shapes like rosettes, stars, and shells on parchment paper before moving to your cake.
When holding the piping bag, grip it firmly about two-thirds down, squeezing gently from the top. Keep your wrist steady while applying even pressure. For straight lines, maintain a consistent height above the surface and move your whole arm rather than just your wrist.
Experiment with different tips to create unique designs. Round tips are great for writing, while star tips add dimension. Always clean the tips regularly to avoid clogs. With patience and practice, you’ll find that these basic piping techniques will allow you to create beautifully decorated cakes that impress everyone. Happy piping!
Advanced Piping Techniques for Intricate Designs
Building on the foundational techniques you’ve practiced, advanced piping opens up a world of intricate designs that can improve your cake decorating skills. Mastering these techniques allows you to create stunning visuals that impress. Here are four to try:
Building on your foundational techniques, advanced piping unlocks intricate designs that elevate your cake decorating skills to new heights.
- Advanced Floral Designs: Use petal tips to create lifelike flowers. Experiment with colors for added depth.
- Intricate Lacework: Pipe delicate patterns that mimic lace. Practice steady pressure and movement for consistency.
- Rope Borders: Create elegant borders by alternating between a round tip and a star tip, giving it a textured look.
- Filigree Accents: Use a fine tip to add swirls and loops, enriching your cake with intricate details.
With patience and practice, you’ll uplift your designs, transforming your cakes into works of art. Don’t hesitate to experiment and let your creativity shine!
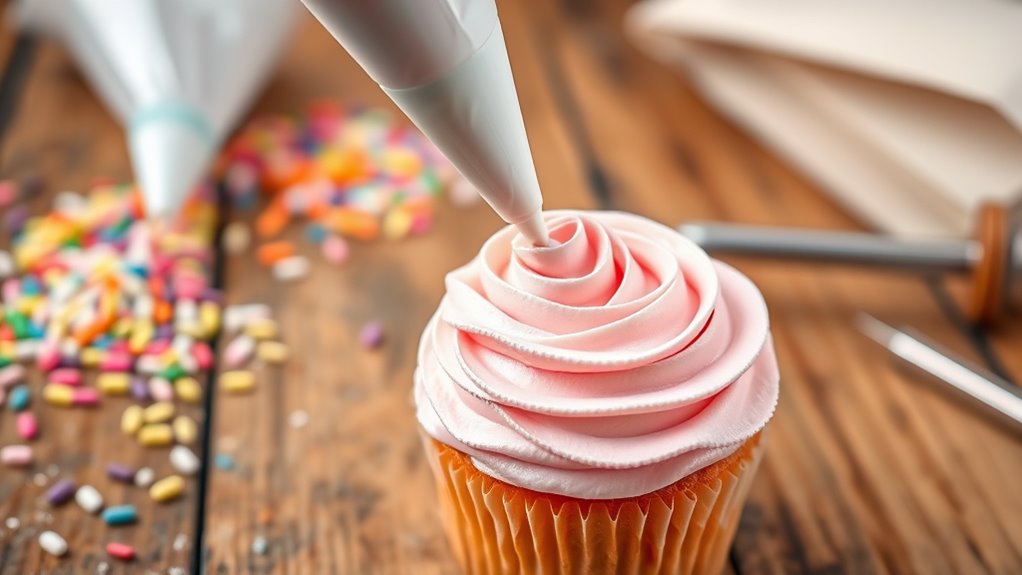
How to Pipe Beautiful Cupcake Decorations
While you might feel intimidated by the idea of piping beautiful cupcake decorations, it’s actually easier than it seems with a little practice. Start by choosing your favorite cupcake flavors; chocolate, vanilla, or red velvet all work great.
Once your cupcakes are cooled, select the right frosting types. Cream cheese, buttercream, or ganache can enhance your designs.
Fill your piping bag with frosting, using a star tip for classic swirls or a round tip for simple dollops. Hold the bag at a 90-degree angle above the cupcake, applying gentle pressure as you move in circles or zigzags.
Don’t rush! Take your time to create even layers.
Experiment with different techniques, like adding sprinkles or edible glitter for a fun finish. With each attempt, you’ll refine your skills, making your cupcakes not just delicious but visually stunning, too!
How to Pipe Borders and Ruffles on Cakes
Piping borders and ruffles on cakes can boost your baking to a whole new level, just like adding decorative swirls to cupcakes. Mastering these techniques requires attention to detail and practice. Here’s how to get started:
Elevate your baking with piping borders and ruffles; mastering these techniques takes practice and precision.
- Choose Your Border Styles: Select from classic, scalloped, or shell borders to create the perfect finish.
- Perfect Your Ruffle Techniques: Use a ruffle tip and apply steady pressure while moving your hand in a wave-like motion.
- Adjust Your Piping Speed: Maintain a consistent speed to guarantee even icing distribution.
- Focus on Icing Consistency: Your icing should be smooth yet firm, enabling easy application without collapsing.
As you practice, experiment with pattern variations and color blending to improve your designs. Remember, a good tool grip and pressure control are essential for achieving clean, beautiful decorations. Happy piping!
Common Piping Challenges and Solutions
Even experienced bakers encounter challenges when using a piping bag, so it’s essential to know how to troubleshoot common issues. One frequent problem is piping bag leaks, which often stem from overfilling issues. To avoid this, fill your bag no more than halfway.
If you face inconsistent pressure, check your grip and make sure your fingers aren’t blocking the tip.
Tip selection struggles can also lead to messy results. Choosing the right tip for your design is important; practice with different shapes to find what works best.
If your frosting consistency is too thick or too runny, it can cause design frustration. Adjust your frosting by adding a bit of milk or powdered sugar until you achieve the desired texture.
Using these troubleshooting techniques will help you overcome common piping challenges and enhance your decorating skills!
Piping Tool Cleaning and Storage Tips
When you finish decorating, it’s essential to clean your piping tools properly to maintain their longevity and performance. Here are some quick tips to help you with cleaning and storage:
- Rinse Immediately: After use, rinse your piping bags and tips with warm water to prevent dried frosting from hardening.
- Choose Effective Cleaning Solutions: Use mild dish soap or a vinegar solution to thoroughly clean your tools. Avoid harsh chemicals that can damage them.
- Dry Completely: After washing, let your tools air dry on a clean towel to prevent mold growth.
- Store Safely: Place your clean piping bags and tips in designated storage containers. This keeps them organized and protects them from dust and damage.
Frequently Asked Questions
Can I Use a Regular Plastic Bag Instead of a Piping Bag?
Yes, you can use a regular plastic bag instead of a piping bag. Just cut a small corner off the bag to create a makeshift piping tip. While it may not provide the same precision as traditional piping bag materials, it works in a pinch.
If you want more control, consider plastic bag alternatives like silicone squeeze bottles or reusable piping bags. These options can improve your decorating experience and reduce waste.
How Do I Prevent My Piping Bag From Bursting?
To prevent your piping bag from bursting, choose high-quality materials that can withstand pressure, like silicone or thicker plastic. When filling the bag, don’t overfill it. Keep it about two-thirds full.
As you apply pressure, control it carefully because too much can lead to a blowout. If you notice any weak spots, reinforce them with tape or switch bags. This will help guarantee your decorating goes smoothly without any mishaps!
What Should I Do if My Icing Is Too Thick?
If your icing’s too thick, you can easily fix it by thinning it out. Did you know that 65% of decorators struggle with icing consistency?
To achieve the ideal consistency, add a few drops of water or milk, mixing well until it flows smoothly. Test it by piping a small amount; it should hold shape but not be stiff.
Keep adjusting until you get that perfect texture for your decorating needs!
Is It Necessary to Use a Coupler With Piping Tips?
Using a coupler with piping tips isn’t strictly necessary, but it offers some great benefits. It lets you easily switch out piping tip types without changing the entire bag, saving you time and hassle.
If you’re decorating with multiple designs, a coupler simplifies the process. Plus, it guarantees a snug fit, preventing any icing leaks.
How Can I Practice Piping Without Wasting Ingredients?
You can practice piping techniques without wasting ingredients by using practice surfaces like parchment paper or wax paper. Simply pipe your designs onto these surfaces, let them dry, and reuse them as needed.
You can even create a “piping notebook” by layering sheets and practicing different techniques on each one. This way, you’ll get comfortable with your piping bag while saving your ingredients for when you’re ready to decorate your actual treats.
Conclusion
With your piping bag in hand, you’re now equipped to transform simple treats into edible art. Think of each swirl and line as brushstrokes on a canvas, bringing your creativity to life.
Welcome the challenges as stepping stones, guiding you to mastery. Just like a painter perfects their technique, you’ll find joy in each delicious creation.
So, grab that bag, let your imagination flow, and watch as your desserts become dazzling masterpieces that delight the senses. Using a piping bag is the key to perfect decorating every time!